
Septic Solutions – Your Comprehensive Guide to Tank Services
Septic Solutions is your go-to resource for comprehensive tank services, offering a range of solutions to ensure the smooth functioning of your septic system. With a commitment to excellence and customer satisfaction, we provide a one-stop-shop for all your septic needs. Our services encompass septic tank pumping; a critical maintenance task that ensures your system operates efficiently. Regular pumping prevents the accumulation of solid waste, reducing the risk of clogs and potential system failures. Our skilled technicians employ state-of-the-art equipment to carry out thorough and efficient pumping, promoting the longevity of your septic tank. In addition to pumping, we specialize in septic tank inspections, a crucial aspect of proactive maintenance. Our professionals conduct comprehensive assessments to identify potential issues before they escalate. By addressing concerns early on, we help you avoid costly repairs and extend the lifespan of your septic system.
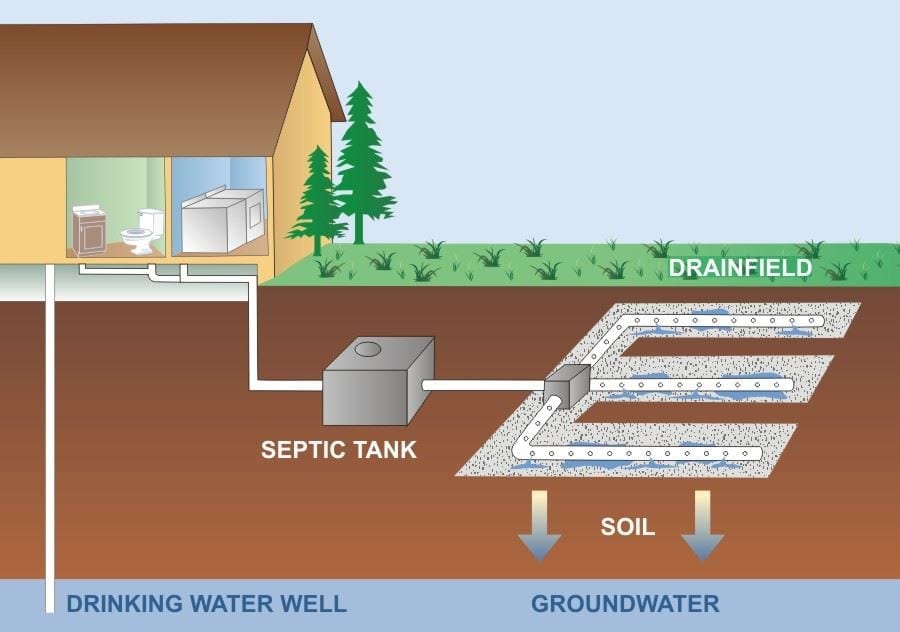
Our thorough inspections encompass not only the tank itself but also the drain field, ensuring the overall health of your entire septic system. Septic Solutions goes beyond routine maintenance with our septic tank cleaning services. Over time, sludge and scum can build up in your tank, hindering its ability to function optimally. Busy B septic system service remove these deposits, promoting proper wastewater treatment and preventing potential environmental hazards. A clean septic tank is essential for maintaining a healthy and efficient system, and our team is dedicated to delivering top-notch cleaning services. For those facing septic emergencies, Septic Solutions offers swift and reliable repairs. Whether you are dealing with a malfunctioning pump, a clogged drain field, or any other issue affecting your system’s performance, our experienced technicians are ready to tackle the problem. We understand the urgency of septic emergencies and strive to provide timely and effective solutions to minimize disruptions to your daily life.
At Septic Solutions, we prioritize environmental responsibility. Our services are designed not only to maintain the functionality of your septic system but also to ensure that it operates in an environmentally friendly manner. Proper maintenance and timely repairs contribute to the prevention of groundwater contamination and protect local ecosystems. Customer satisfaction is at the forefront of our mission. We pride ourselves on transparent communication, fair pricing, and a commitment to exceeding customer expectations. With years of experience in the industry, our team is dedicated to providing reliable and professional septic services. In conclusion, Septic Solutions is your comprehensive guide to all things septic. From routine maintenance to emergency repairs, we offer a wide range of services to keep your septic system running smoothly. Trust us to deliver efficient, reliable, and environmentally responsible solutions for all your septic needs.
 Sustainable remodeling practices often involve the use of recycled or upcycled materials, energy-efficient appliances, and the integration of renewable energy sources like solar panels. As homeowners prioritize reducing their carbon footprint, architects and designers are responding with innovative solutions that marry style and sustainability, transforming homes into environmentally conscious spaces. The trend towards open-concept living spaces continues to dominate contemporary home remodeling projects. Homeowners are opting for designs that promote fluidity between different areas, breaking down traditional barriers between kitchens, dining rooms, and living spaces. This emphasis on open layouts not only fosters a sense of connectivity within the home but also maximizes natural light, creating an airy and spacious ambiance. This design approach reflects a modern lifestyle that values versatility and social interaction, with multifunctional spaces catering to various activities and family dynamics. In the realm of aesthetics, a departure from uniformity has become a defining characteristic of cutting-edge home remodeling. Homeowners are increasingly gravitating towards personalized designs that reflect their individual tastes and lifestyles. This shift is evident in the use of diverse materials, textures, and color palettes that add depth and character to spaces. From reclaimed wood accent walls to bold statement lighting fixtures, the emphasis is on creating unique and visually striking interiors that stand out from the cookie-cutter designs of the past.

